Skip to content

Hosting a Mkdocs-generated Site Using Nginx

Creating exceptional software documentation is a pivotal ingredient for product success. The NOC Team has been on a relentless journey with Project Aegeus to make our documentation truly shine. While top-notch content is essential, the delivery process plays a crucial role in shaping the user experience. In this post, we're shifting our focus to delivery, where we'll reveal some tricks that can take your documentation from good to great.

Mkdocs, especially when adorned with the stylish mkdocs-material theme, is an outstanding tool for crafting project documentation. The outcome is a directory brimming with polished HTML files and static assets. Unlike popular CMS platforms like Joomla or WordPress, your output is a self-contained directory that doesn't rely on additional runtime services or databases. This independence makes it incredibly easy to serve your documentation directly to your audience. While services like "GitHub Pages" and "Read the Docs" have their allure, there's a compelling case for hosting your documentation independently. We, for instance, rely on the rock-solid Nginx web server. In the following sections, we'll offer you a glimpse into our setup and share some simple yet highly effective tweaks to enhance performance.

Let's take a glance at our setup. Here and after we consider that <site> should be replaced with your domain name. We also consider you have Nginx installed and running.

Checking mkdocs.yml

Check the mkdocs.yml file and ensure, your site_url setting is valid:

site_url: https://<site>/

Warning

The https:// prefix is viable for our setup.

DNS Setup

Add A record to your DNS Zone to reach your site

@   IN  A  <ip>

Where <ip> is the IP address of your Nginx server.

Nginx Configuration

Let's take a closer look at our configuration. We are creating two virtual servers, one for HTTP on port 80, and the other for HTTPS on port 443. Each virtual server has its configuration file. I.e. <site>:80.conf and <site>:443.conf, though you can use every other name to your pleasure.

HTTP Setup

Create a first configuration file, named <site>:80.conf, replacing <site> with your domain name.

site:80.conf
 1
 2
 3
 4
 5
 6
 7
 8
 9
10
11
12
13
14
15
16
server {
    listen 80;
    server_name <site>;

    access_log  /var/log/nginx/<site>:80.access.log;
    error_log  /var/log/nginx/<site>:80.error.log;

    location ^~ /.well-known/acme-challenge/ {
       default_type "text/plain";
       root /data/letsencrypt/<site>;
    }

    location / {
        return 301 https://<site>$request_uri;
    }
}

Place it into one of the following paths, depending on your system:

  • /etc/nginx/conf.d/<site>.conf
  • /etc/nginx/sites-available/<site>.conf

If you choose to place config in the sites-available directory, do not forget to create a symlink to enable config:

# cd /etc/nginx/sites-enabled/
# ln -s /etc/nginx/sites-available/<site>:80.conf .

Then check the configuration:

# nginx -T
...
# echo $?
0

If you do all correctly, the command will complete without errors and you will see 0 as a result of the echo.

Reload configuration:

# service nginx reload

Let's examine the configuration:

site:80.conf
 1
 2
 3
 4
 5
 6
 7
 8
 9
10
11
12
13
14
15
16
server {
    listen 80;
    server_name <site>;

    access_log  /var/log/nginx/<site>:80.access.log;
    error_log  /var/log/nginx/<site>:80.error.log;

    location ^~ /.well-known/acme-challenge/ {
       default_type "text/plain";
       root /data/letsencrypt/<site>;
    }

    location / {
        return 301 https://<site>$request_uri;
    }
}

Listen for virtual site <site> on default HTTP port 80.

site:80.conf
 1
 2
 3
 4
 5
 6
 7
 8
 9
10
11
12
13
14
15
16
server {
    listen 80;
    server_name <site>;

    access_log  /var/log/nginx/<site>:80.access.log;
    error_log  /var/log/nginx/<site>:80.error.log;

    location ^~ /.well-known/acme-challenge/ {
       default_type "text/plain";
       root /data/letsencrypt/<site>;
    }

    location / {
        return 301 https://<site>$request_uri;
    }
}

Set up logging.

site:80.conf
 1
 2
 3
 4
 5
 6
 7
 8
 9
10
11
12
13
14
15
16
server {
    listen 80;
    server_name <site>;

    access_log  /var/log/nginx/<site>:80.access.log;
    error_log  /var/log/nginx/<site>:80.error.log;

    location ^~ /.well-known/acme-challenge/ {
       default_type "text/plain";
       root /data/letsencrypt/<site>;
    }

    location / {
        return 301 https://<site>$request_uri;
    }
}

We using Certbot to obtain TLS certificates from Letsencrypt. We're creating a well-known entrypoint to process a certificate request.

site:80.conf
 1
 2
 3
 4
 5
 6
 7
 8
 9
10
11
12
13
14
15
16
server {
    listen 80;
    server_name <site>;

    access_log  /var/log/nginx/<site>:80.access.log;
    error_log  /var/log/nginx/<site>:80.error.log;

    location ^~ /.well-known/acme-challenge/ {
       default_type "text/plain";
       root /data/letsencrypt/<site>;
    }

    location / {
        return 301 https://<site>$request_uri;
    }
}

We forcing our users to use HTTPS, redirecting all other requests to the HTTPS version of the site.

Certbot Setup

Before passing to the HTTPS section we need to receive a TLS certificate. We're using Certbot to request certificates via Letsencrypt.

To request the certificate:

# certbot --nginx -d <site>

Check that our certificates are present in place:

# ls /etc/letsencrypt/live/<site>/
fullchain.pem
privkey.pem

HTTPS Setup

If all is correct, create a file named <site>:443.conf, replacing <site> with your domain name.

site:443.conf
 1
 2
 3
 4
 5
 6
 7
 8
 9
10
11
12
13
14
15
16
17
18
19
20
21
22
23
24
25
26
27
28
29
30
31
32
33
34
35
36
server {
    listen 443 ssl http2;
    server_name <site>;

    ssl_protocols TLSv1.3 TLSv1.2;
    ssl_certificate /etc/letsencrypt/live/<site>/fullchain.pem; # managed by Certbot
    ssl_certificate_key /etc/letsencrypt/live/<site>/privkey.pem; # managed by Certbot
    add_header Strict-Transport-Security "max-age=63072000; includeSubDomains";
    ssl_stapling on;
    ssl_stapling_verify on;

    access_log  /var/log/nginx/<site>:443.access.log;
    error_log  /var/log/nginx/<site>:443.error.log;

    root /www/<site>;
    error_page 404 /404.html;

    add_header X-Content-Type-Options nosniff;

    gzip on;
    gzip_types text/html application/javascript text/css text/xml application/json;

    location ~* .min.(css|js)$ {
        add_header Cache-Control "max-age=604800";
        add_header Surrogate-Control "max-age=604800";
    }

   location /search/search_index.json {
        add_header Cache-Control "max-age=3600";
        add_header Surrogate-Control "max-age=3600";
   }

    location /.minio.sys/ {
        deny all;
    }
}

Place it into one of the following paths, depending on your system:

  • /etc/nginx/conf.d/<site>.conf
  • /etc/nginx/sites-available/<site>.conf

If you choose to place config in the sites-available directory, do not forget to create a symlink to enable config:

# cd /etc/nginx/sites-enabled/
# ln -s /etc/nginx/sites-available/<site>:443.conf .

Then check the configuration:

# nginx -T
...
# echo $?
0

If you do all correctly, the command will complete without errors and you will see 0 as a result of the echo.

Reload configuration:

# service nginx reload

Let's examine the configuration:

site:443.conf
 2
 3
 4
 5
 6
 7
 8
 9
10
11
12
13
    listen 443 ssl http2;
    server_name <site>;

    ssl_protocols TLSv1.3 TLSv1.2;
    ssl_certificate /etc/letsencrypt/live/<site>/fullchain.pem; # managed by Certbot
    ssl_certificate_key /etc/letsencrypt/live/<site>/privkey.pem; # managed by Certbot
    add_header Strict-Transport-Security "max-age=63072000; includeSubDomains";
    ssl_stapling on;
    ssl_stapling_verify on;

    access_log  /var/log/nginx/<site>:443.access.log;
    error_log  /var/log/nginx/<site>:443.error.log;

Listen for virtual site <site> on default HTTPЫ port 443 and enable HTTP/2.

site:443.conf
 2
 3
 4
 5
 6
 7
 8
 9
10
11
12
13
    listen 443 ssl http2;
    server_name <site>;

    ssl_protocols TLSv1.3 TLSv1.2;
    ssl_certificate /etc/letsencrypt/live/<site>/fullchain.pem; # managed by Certbot
    ssl_certificate_key /etc/letsencrypt/live/<site>/privkey.pem; # managed by Certbot
    add_header Strict-Transport-Security "max-age=63072000; includeSubDomains";
    ssl_stapling on;
    ssl_stapling_verify on;

    access_log  /var/log/nginx/<site>:443.access.log;
    error_log  /var/log/nginx/<site>:443.error.log;
Enable TLSv1.3 and TLSv1.2, do not use older versions.

site:443.conf
 2
 3
 4
 5
 6
 7
 8
 9
10
11
12
13
    listen 443 ssl http2;
    server_name <site>;

    ssl_protocols TLSv1.3 TLSv1.2;
    ssl_certificate /etc/letsencrypt/live/<site>/fullchain.pem; # managed by Certbot
    ssl_certificate_key /etc/letsencrypt/live/<site>/privkey.pem; # managed by Certbot
    add_header Strict-Transport-Security "max-age=63072000; includeSubDomains";
    ssl_stapling on;
    ssl_stapling_verify on;

    access_log  /var/log/nginx/<site>:443.access.log;
    error_log  /var/log/nginx/<site>:443.error.log;
Use TLS certificates, prepared by Certbot.

site:443.conf
 2
 3
 4
 5
 6
 7
 8
 9
10
11
12
13
    listen 443 ssl http2;
    server_name <site>;

    ssl_protocols TLSv1.3 TLSv1.2;
    ssl_certificate /etc/letsencrypt/live/<site>/fullchain.pem; # managed by Certbot
    ssl_certificate_key /etc/letsencrypt/live/<site>/privkey.pem; # managed by Certbot
    add_header Strict-Transport-Security "max-age=63072000; includeSubDomains";
    ssl_stapling on;
    ssl_stapling_verify on;

    access_log  /var/log/nginx/<site>:443.access.log;
    error_log  /var/log/nginx/<site>:443.error.log;
Always set Strict-Transport-Security header to enable HSTS. The HSTS informs browsers that the site should only be accessed using HTTPS and that any future attempts to access it using HTTP should automatically be converted to HTTPS.

site:443.conf
 2
 3
 4
 5
 6
 7
 8
 9
10
11
12
13
    listen 443 ssl http2;
    server_name <site>;

    ssl_protocols TLSv1.3 TLSv1.2;
    ssl_certificate /etc/letsencrypt/live/<site>/fullchain.pem; # managed by Certbot
    ssl_certificate_key /etc/letsencrypt/live/<site>/privkey.pem; # managed by Certbot
    add_header Strict-Transport-Security "max-age=63072000; includeSubDomains";
    ssl_stapling on;
    ssl_stapling_verify on;

    access_log  /var/log/nginx/<site>:443.access.log;
    error_log  /var/log/nginx/<site>:443.error.log;
Enable Online Certificate Status Protocol (OSCP) stapling to check the revocation status of the certificates in an efficient manner.
site:443.conf
 2
 3
 4
 5
 6
 7
 8
 9
10
11
12
13
    listen 443 ssl http2;
    server_name <site>;

    ssl_protocols TLSv1.3 TLSv1.2;
    ssl_certificate /etc/letsencrypt/live/<site>/fullchain.pem; # managed by Certbot
    ssl_certificate_key /etc/letsencrypt/live/<site>/privkey.pem; # managed by Certbot
    add_header Strict-Transport-Security "max-age=63072000; includeSubDomains";
    ssl_stapling on;
    ssl_stapling_verify on;

    access_log  /var/log/nginx/<site>:443.access.log;
    error_log  /var/log/nginx/<site>:443.error.log;

Set up logging.

site:443.conf
15
16
17
18
19
20
21
    root /www/<site>;
    error_page 404 /404.html;

    add_header X-Content-Type-Options nosniff;

    gzip on;
    gzip_types text/html application/javascript text/css text/xml application/json;
Serve static files from /www/<site>/ directory. We use Minio's S3 endpoint to deliver our documentation, though you can simple put your files in place using any available method.
site:443.conf
15
16
17
18
19
20
21
    root /www/<site>;
    error_page 404 /404.html;

    add_header X-Content-Type-Options nosniff;

    gzip on;
    gzip_types text/html application/javascript text/css text/xml application/json;

To enhance the user experience, replace Nginx's default 404 page with the stylish page provided by mkdocs-material. This step is crucial as the customized page offers standard navigation and search functionalities, enabling users to easily access all the information they need.

site:443.conf
15
16
17
18
19
20
21
    root /www/<site>;
    error_page 404 /404.html;

    add_header X-Content-Type-Options nosniff;

    gzip on;
    gzip_types text/html application/javascript text/css text/xml application/json;
Configure the X-Content-Type-Options header for all responses to specify that the advertised MIME types in the Content-Type headers should be strictly followed and not altered. This header helps prevent MIME type sniffing by explicitly stating that the MIME types are intentionally set and should not be modified.

site:443.conf
15
16
17
18
19
20
21
    root /www/<site>;
    error_page 404 /404.html;

    add_header X-Content-Type-Options nosniff;

    gzip on;
    gzip_types text/html application/javascript text/css text/xml application/json;
Activate gzip compression for all web browsers. This feature will automatically compress HTML, CSS, JSON, and XML files for all modern browsers. Data compression plays a vital role in reducing network traffic, offering substantial advantages to mobile users, and boosting page loading speed. We have fine-tuned the compression settings to work seamlessly with content generated by mkdocs-material, ensuring an optimized user experience.
site:443.conf
23
24
25
26
27
28
29
30
31
32
33
34
35
36
    location ~* .min.(css|js)$ {
        add_header Cache-Control "max-age=604800";
        add_header Surrogate-Control "max-age=604800";
    }

   location /search/search_index.json {
        add_header Cache-Control "max-age=3600";
        add_header Surrogate-Control "max-age=3600";
   }

    location /.minio.sys/ {
        deny all;
    }
}

For even more efficient file serving, we've implemented some additional optimizations, specifically targeting the minified CSS and JS content generated by the mkdocs-material theme. To improve caching efficiency, mkdocs-material appends a unique hash to the file names.

Here's what we've done:

  • Cache-Control`` Header: We've configured theCache-Control`` header to instruct the browser to store these minified files for a week, reducing the need for additional requests as users navigate through our documentation.
  • Surrogate-Control Header: We've added the Surrogate-Control header to notify upstream CDNs (Content Delivery Networks) to cache these replies whenever possible.

Efficient file caching is yet another step we've taken to enhance the user experience, ensuring that your documentation loads swiftly and reliably.

site:443.conf
23
24
25
26
27
28
29
30
31
32
33
34
35
36
    location ~* .min.(css|js)$ {
        add_header Cache-Control "max-age=604800";
        add_header Surrogate-Control "max-age=604800";
    }

   location /search/search_index.json {
        add_header Cache-Control "max-age=3600";
        add_header Surrogate-Control "max-age=3600";
   }

    location /.minio.sys/ {
        deny all;
    }
}
Mkdocs-material maintains a database for online search, stored in the search_index.json file. For complex documentation, like NOC's, this JSON file can become quite large, roughly around 4 megabytes. Since we frequently update our content, long-term caching isn't practical. Therefore, we've established a reasonable default of one hour for caching this file.

Just like with minified files, we've configured the Cache-Control and Surrogate-Control options for the search_index.json file. These settings help optimize the caching of this file, ensuring that users can perform online searches effectively without compromising the freshness of the data.

site:443.conf
23
24
25
26
27
28
29
30
31
32
33
34
35
36
    location ~* .min.(css|js)$ {
        add_header Cache-Control "max-age=604800";
        add_header Surrogate-Control "max-age=604800";
    }

   location /search/search_index.json {
        add_header Cache-Control "max-age=3600";
        add_header Surrogate-Control "max-age=3600";
   }

    location /.minio.sys/ {
        deny all;
    }
}
Since we're utilizing Minio for content uploads, it's crucial to safeguard Minio's internal database from accidental exposure. To achieve this, we take the straightforward approach of denying access to the internal directory. This ensures that the inner workings of Minio remain protected and inaccessible to unauthorized parties.

Adding robots.txt

Last but not least, we want to simplify the lives of search engine bots. You can achieve this by simply including a robots.txt file in your docs/ directory to ensure it's generated alongside your documentation. Don't forget to replace <site> with your domain name in the file. This step ensures that search engine crawlers can efficiently navigate and index your content, contributing to its discoverability on the web.

robots.txt
1
2
3
4
User-agent: *
Allow: /

Sitemap: https://<site>/sitemap.xml

Let's look closer:

robots.txt
1
2
3
4
User-agent: *
Allow: /

Sitemap: https://<site>/sitemap.xml

Allow all bots to index our documentation.

robots.txt
1
2
3
4
User-agent: *
Allow: /

Sitemap: https://<site>/sitemap.xml

Let's also inform search engine bots that we have a sleek sitemap generated by mkdocs-material. This will help the bots efficiently crawl and index our content, making it more discoverable on the web.

Results

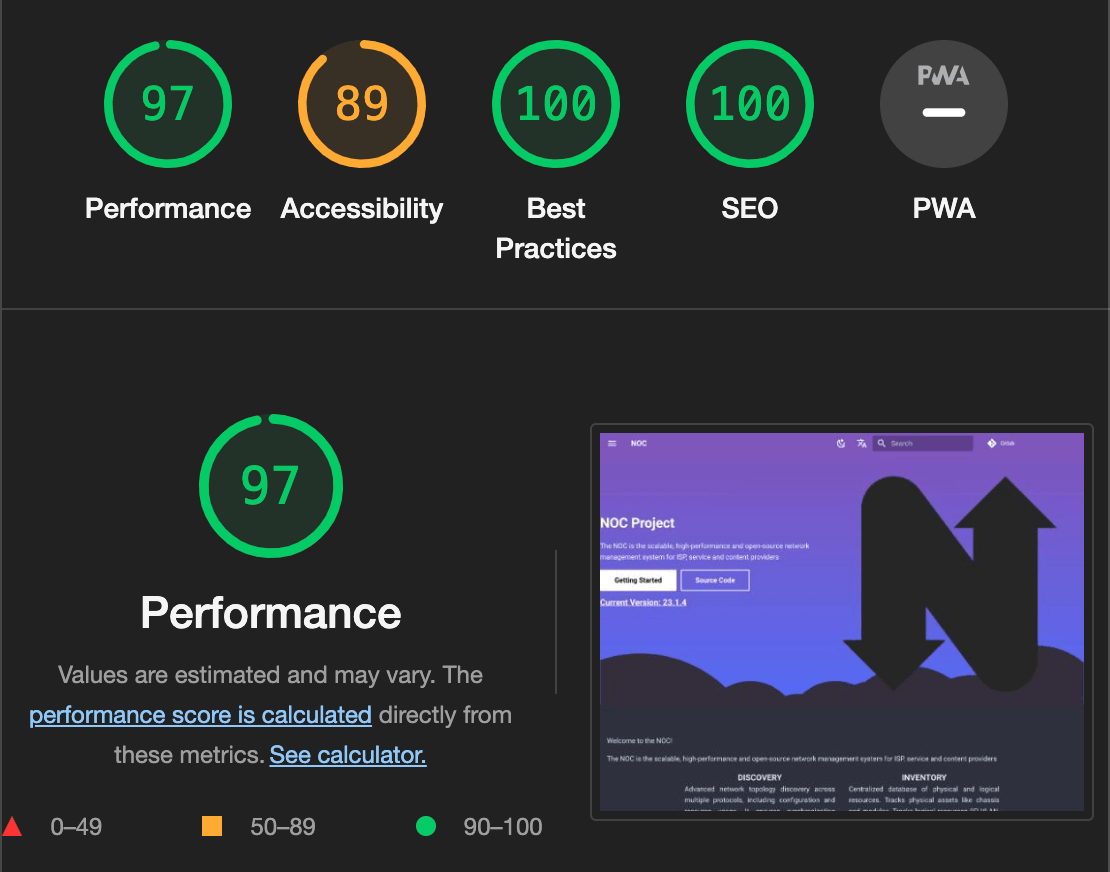
We utilized Google Chrome's Lighthouse tool to evaluate the user experience of our home page, https://getnoc.com/.

Before implementing the changes and using the standard boilerplate for serving static files, we had an overall performance score of 75.

However, after applying all the tweaks we've discussed in this post, we significantly improved our performance, achieving an outstanding overall score of 97.

Lighthouse screenshot

These methods are not limited to our use case; anyone looking to host mkdocs-material sites with only the default set of Nginx features can benefit from them. We hope that our insights and experience will help you enhance the user experience of your documentation.